
If you maintain a tool with a JSON configuration file, you’ve probably written documentation explaining its properties. Which ones are required? What values are allowed? Is that setting a string or a number?
A JSON schema lets you put those answers directly into the editor. Add that schema to SchemaStore, and you make it discoverable by an entire ecosystem of editors and language servers, not just the one you happen to use.
In my earlier post, Schemastore.org: The journey of a quiet revolution, I shared how the project started and grew through community contributions. This time, let’s get practical: how do you add your own schema?
Write it once, use it across editors
SchemaStore provides a shared catalog that associates configuration files with JSON schemas. Supporting tools use those schemas to offer property completion, validate values, and display documentation as you type.
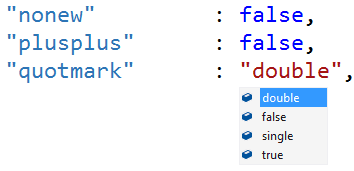
The ecosystem includes Visual Studio, JetBrains IDEs, and integrations for VS Code, Neovim, Emacs, and other editors.
Does that mean literally every editor, immediately after your pull request is merged? No. Editors differ in how they discover schemas, which JSON Schema features they support, and when they refresh their catalogs. Some require an extension or configuration.
But you don’t need to build and maintain a separate editor extension for each one. The schema is the shared investment.
1. Describe your configuration file
Let’s use a fictional tool called Acme Build, with a configuration file named acmebuild.json:
{
  "outputDirectory": "dist",
  "minify": true
}
Here’s a schema describing that format:
{
  "$schema": "http://json-schema.org/draft-07/schema#",
  "$id": "https://www.schemastore.org/acmebuild.json",
  "title": "Acme Build configuration",
  "description": "Configuration for Acme Build.",
  "type": "object",
  "properties": {
    "outputDirectory": {
      "type": "string",
      "description": "Directory where generated files are written."
    },
    "minify": {
      "type": "boolean",
      "description": "Whether to minify generated files."
    }
  },
  "required": ["outputDirectory"]
}
The SchemaStore URL here is illustrative. It would become the hosted schema’s address after the contribution is accepted and deployed.
SchemaStore currently recommends JSON Schema Draft 7 for broad editor compatibility. Newer drafts exist, but support across editors and language servers varies.
Notice the description properties. Don’t skip them. They turn a list of property names into useful documentation inside the editor.
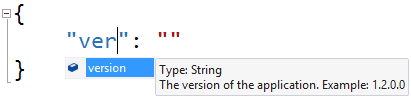
Also, describe what your tool actually accepts. Don’t add additionalProperties: false automatically: it can flag legitimate configuration as invalid when your tool gains new settings or supports extensions.
2. Add the schema to SchemaStore
Start by forking the SchemaStore repository and cloning your fork. With a supported version of Node.js installed, check the repository’s package.json, then run these commands from the repository directory:
npm clean-install
node cli.js new-schema
The generator prompts for a schema name. For our example, use acmebuild.
It creates a schema file and a positive test file, then prints a catalog entry for you to add. Replace the generated schema with your actual definition.
The relevant locations are:
src/schemas/json/acmebuild.json
src/test/acmebuild/acmebuild.json
src/api/json/catalog.json
Your contribution should target a configuration format that people use, or one with potential for broad adoption, not a private file specific to one machine.
3. Tell editors which files it applies to
Add an entry to src/api/json/catalog.json, in alphabetical order:
{
  "name": "Acme Build",
  "description": "Acme Build configuration file",
  "fileMatch": ["acmebuild.json"],
  "url": "https://www.schemastore.org/acmebuild.json"
}
The schema describes the contents. The catalog helps tools discover when to use it.
The fileMatch property is particularly important for automatic association. Use a distinctive filename, not something generic like config.json or *.json. A broad pattern could associate your schema with somebody else’s completely unrelated configuration.
If your format has no distinctive filename, you can omit fileMatch. The schema can still be referenced explicitly or associated through editor settings.
Already hosting a schema yourself? You don’t have to move it. You can contribute a catalog entry whose url points to your publicly accessible schema instead. That lets you keep the schema alongside your tool’s source code and release process.
4. Add examples and run the checks
Put valid example configurations under src/test/acmebuild/. The configuration shown earlier makes a useful starting point.
Negative tests go under src/negative_test/acmebuild/. For example, this should fail because minify must be a boolean:
{
  "outputDirectory": "dist",
  "minify": "yes"
}
Use separate negative examples for different mistakes, such as a missing required property. That makes failures easier to understand.
Run the repository’s check for your schema:
node cli.js check --schema-name=acmebuild.jsonOnce your checks pass, open a pull request. Include a link to your tool and its configuration documentation so reviewers can compare the schema with the real format.
The contribution guide covers the current process, including externally hosted schemas and multiple schema versions.
5. Make the editor connection explicit when needed
Once the contribution is merged and deployed, tools that consume the catalog can discover it on their next refresh. There isn’t a single refresh schedule shared by all editors.
There’s an important VS Code detail here: its built-in JSON support does not automatically consume the entire SchemaStore catalog. For catalog-based discovery, users can install the SchemaStore extension. Alternatively, they can associate a schema through settings or reference it directly in their JSON file:
{
  "$schema": "https://www.schemastore.org/acmebuild.json",
  "outputDirectory": "dist",
  "minify": true
}
Only recommend that last approach if your application accepts the extra $schema property. It’s an editor convention, not a property every configuration parser will tolerate.
Also, don’t confuse the two uses of $schema: inside the schema document, it identifies the JSON Schema dialect; inside a configuration file, supporting editors use it to locate the schema for that file.
If nothing happens in an editor, check its schema association, JSON language mode, extension requirements, and whether remote schema downloads are enabled.
A small contribution with a wide reach
You don’t need a huge schema to make a useful contribution. Start with the properties your tool supports, write helpful descriptions, and add realistic examples.
And this isn’t limited to JSON configuration files. Supporting YAML and TOML tooling can use JSON schemas too, so the same work can benefit users of those formats.
That’s what I like about this model: the knowledge about a configuration format lives in a shared resource instead of being reimplemented for each editor.
If your tool has a configuration file, take a look at the SchemaStore catalog and the contribution guide. If its schema is missing, send us a pull request. You don’t have to be a JSON Schema expert to get started.
Comments
What did you think?