Today I had to find a way to force x number of rows on a GridView. The problem is that if the GridView.PageSize is larger than the number of rows you are data binding, the GridView itself gets smaller in the height. You often see it when paging through the pages of a grid. The last page is always shorter than the rest, because there are fewer rows. That is usually not a issue, but I had to keep our designers happy.

It is actually pretty simple in a class that inherits from System.Web.UI.WebControls.GridView. Just override the OnDataBound method and add the extra rows. In this example, the number of rows is always the same as the PageSize property and still keeping the footer row at the bottom.

protected override void OnDataBound(EventArgs e)
{
 GridViewRow gvRow = null;

 for (int rows = this.Rows.Count; rows < this.PageSize; rows++)
 {
  gvRow = new GridViewRow(0, 0, DataControlRowType.DataRow, DataControlRowState.Normal);

  for (int columns = 0; columns < this.Columns.Count; columns++)
  {
   gvRow.Controls.Add(new TableCell());
  }

  //Inserts the rows right above the footer row.
  //Remove the "- 1" if you are not using a footer.
  this.Controls[0].Controls.AddAt(this.Controls[0].Controls.Count - 1, gvRow);
 }
}
You have probably at some point clicked the wrong input button on a web page, and something bad happened. You deleted the wrong user, submitted to the wrong newsletter or something similar. Wouldn't it have been nice if you had been asked to confirm a critical decision like that? In ASP.NET it is so easy to create functionality around post backs caused by input buttons or similar click-controls. This is also the reason why it is important to let the user confirm actions to avoid mistakes.

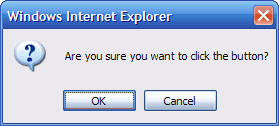
I remember this exact issue when I started in ASP.NET 4 years ago. Back then I did some silly things in order to make the proper confirmation functionality, but hey, it worked. Of course, I had to find the easiest way, and I believe I did. I have used this simple exercise for all of my web projects, simply because it is the simplest and best way to do it. It mixes a regular ASP.NET button control with the JavaScripts confirm dialog. Here's how it looks like when you click the button.

If you press the OK button, the postback continues processing whatever server-side functionality you have implemented. If you press Cancel, nothing happens and the action has indeed been canceled.

To make it work, your have to use a regular button control and add an onclick attribute to it on runtime.
This is how it is done in ASP.NET 1.x

<script language="C#" runat="server">
private void Page_Load(object sender, System.EventArgs e)
{
    btnConfirm.Attributes.Add("onclick", "return confirm('Are you sure you want to click the button?');");    
}
</script>

<asp:Button Runat="server" ID="btnConfirm" Text="Confirm" />

And the much easier way in ASP.NET 2.0

<asp:Button Runat="server" ID="btnConfirm" Text="Confirm" OnClientClick="return confirm('Are you sure you want to click the button?');" />

And finally the old fashion HTML way

<input type="submit" value="Confirm" onclick="return confirm('Are you sure you want to click the button?');" />

There is nothing fancy about this little trick, but it may help you do it a little easier. I for one could have used this trick a couple of years ago. Enjoy.